flowchart LR
  A[1. VS Code] --> B(2. Github)
  B --> C{3. AWS EC2}
How to deploy a Streamlit app
Streamlit
Data Science
dashboard
Github actions
Github
AWS
Deployment is a crucial part of delivering value to your stakeholders, in this guide I will show you how to do it.
In the previous blogpost I showed you how to create a Streamlit application and now it is ready to be digested by the team. We will do this by deploying it to Github and AWS EC2.
How to deploy a Streamlit app as a video
What you will need
- A Streamlit app that you want to deploy. If you do not have one, create one by following my previous post.
- A Github account
- An AWS account
Overview
To get a grasp of what the architecture looks like it is the following.
- We have an app in VS Code that is ready to get pushed to Github.
- At Github the app is version controlled. If you get a malfunctioning app, you can always reverse the app version to the most recent working version.
- From AWS EC2 we will use the Github PAT in order to access the Streamlit app in the Github repo. AWS EC2 will take the code, run it and return an ip address which will be accessible by anyone who has the address.
Create a Github repo
First step is to create a new github repo for the Streamlit app. It does not matter if it is public or private. I will make my repo for this example public.
Push the app to Github
Connect your VS Code to the repo and push your application. You should see your code in the repo.
Create a personal access token (PAT)
If you have a public repo with your Streamlit app and want to keep it public, then it is not necessary to create a PAT. Skip to the next step.
Github personal access token (PAT) is used to access your Github account from AWS EC2. In order to do this you need to do the following steps:
- Go to Github PAT
- Login with your github credentials
- Create a PAT, give it a name and access to repos. Leave the rest unchecked.
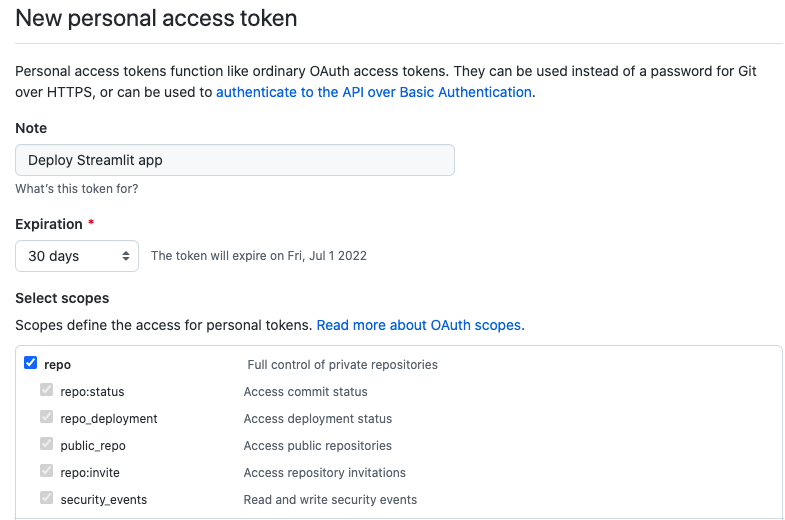
- Press ‘Generate Token’ and save the token on a safe location
AWS EC2
Go to AWS, login to your account. Go to AWS EC2. Here we have lots of options: Size of the machine, security protocols and network settings.
AWS EC2 does have options for a free tier. The conditions changes, but you should see some option that does not cost anything for a year or so. This means you can do this without having it costing you anything, at least for the testing.
Spin up a micro instance
Give your instance a name, make sure you can understand what the machine does. Choose a machine that fits your needs or simply the cheapest one if you are just testing. It is possible to change this later as well if you need to scale up.
Create a keypair
You will need a key pair to access your machine. Press create new pair, add a simple name and go with the defaults.
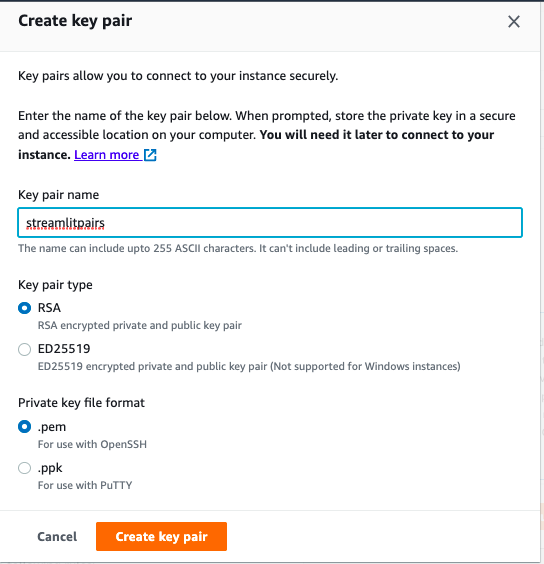
Press create key pair and it will download instantly.
Network settings
You should change the “Allow SSH traffic from” to only include your own ip address. Click on the dropdown and here you can see your own ip address. This is important since anyone will be allowed to access your machine otherwise.
After the network settings are finished, press “Launch instance”. It should send you back to the overview of all the instances you have.
Change the security group
The default group is not allowing connections to the Streamlit port, therefore we need to created a new security group and assign it to the EC2 machine.
First step is to go to AWS, search for security groups. Go to it. 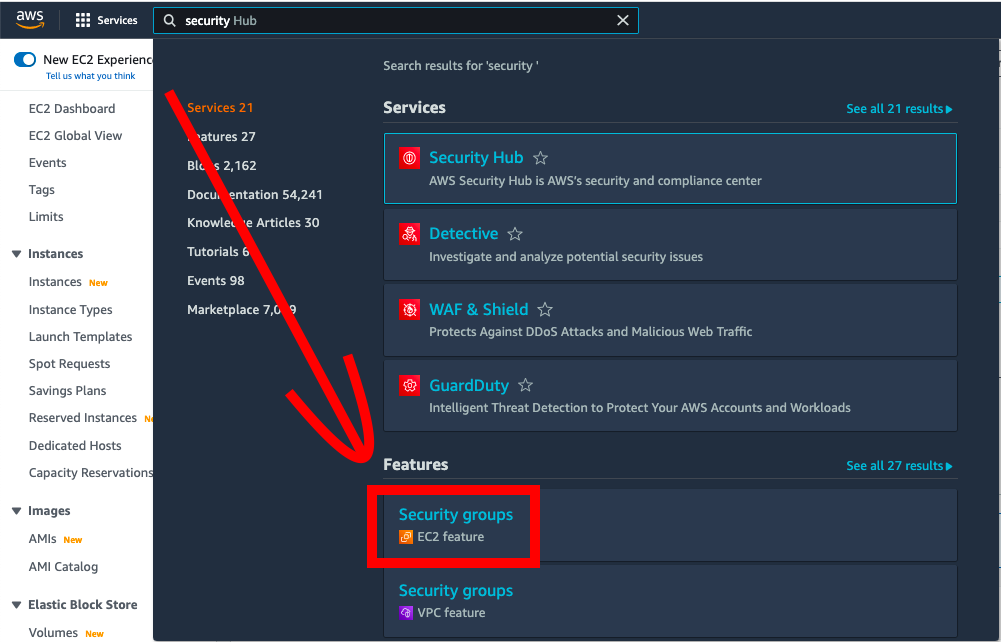
Go to “Create security group”, the orange button on the top-left corner. Give it name, a small description and create two inbound rules:
- SSH access (port 22)
- Streamlit access (Custom TCP - port 8501)
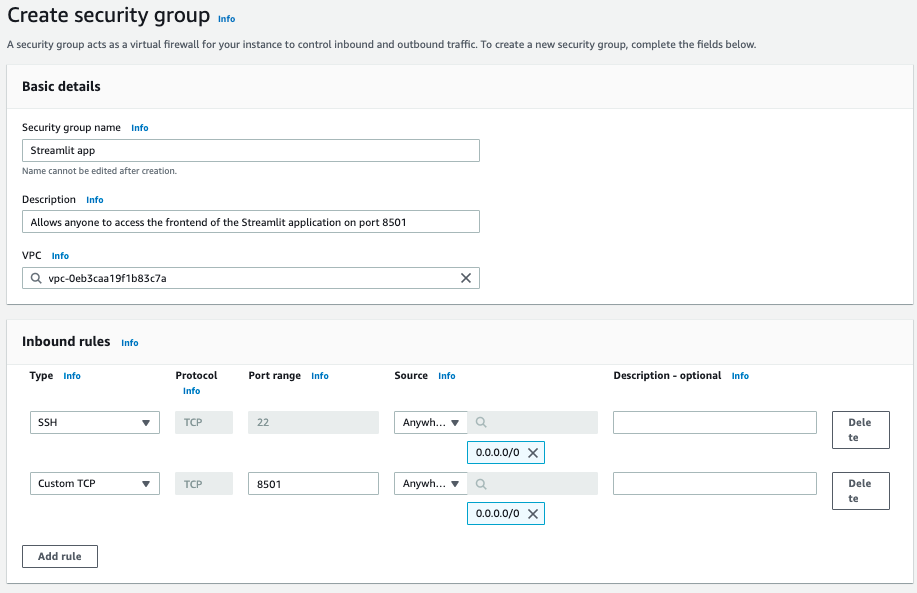
Leave outbound ports to default (all traffic to anyone).
Apply the security group to the instance
Return to EC2, go to your machine you just created. Go to Actions –> Security groups –> Change Security groups –> Add the security group you created in the previous step and save changes.
Connect to your EC2 machine
Next step is to connect to the EC2 machine. Go to the overview of instances in AWS EC2. Go into the instance you just created and look in the upper right corner for a button called “Connect”. Go to “SSH client” and you should see something like the following:
1. Open an SSH client.
2. Locate your private key file. The key used to launch this instance is streamlitpair.pem
3. Run this command, if necessary, to ensure your key is not publicly viewable.
 chmod 400 streamlitpair.pem
3. Connect to your instance using its Public DNS:
 {INSTANCE}.eu-north-1.compute.amazonaws.com
Example:
 ssh -i "streamlitpair.pem" ec2-user@{INSTANCE}.eu-north-1.compute.amazonaws.com
We can now use this information to connect to the AWS EC2 machine.
Open up a CLI (terminal/cmd), find the path to the key pair we downloaded earlier. I have my key in the downloads folder. You will need to find your path the pem file and also change the AWS instance link. In order to connect we will run something like the following:
chmod 400 "~/downloads/streamlitpairs.pem"chmod 400 will protect your key so it is not publicly viewable. If you do not run it, you might run into issues with connecting. Next chunk is the connection.
ssh -i "~/downloads/streamlitpairs.pem" ec2-user@{INSTANCE}.eu-north-1.compute.amazonaws.comWhen connecting, you might get a warning for fingerprint for the host, informing you it is not a known host. Since you created it, you can accept it.
Congratulations, you should now be inside the AWS EC2 instance! Save this command as you will need it for later. Now that we are inside the linux machine we can fetch the Streamlit app from github. If you are not familiar with linux, I can recommend using a few commands to navigate around. Skip this if you feel comfortable with Linux.
Useful commands in Linux
Here are some generic Linux commands that will help you in the Linux jungle.
# List all files in a directory

ls

# change directory

cd {FOLDERNAME}

# Move upward in the folder tree

cd ..

# Install apps (This applies to the AWS Linux machines)

sudo yum install {APPNAME}

# Edit files

sudo nano {FILE_NAME}

# print file

sudo cat {FILE_NAME}
Pull your github repo into AWS EC2
Now we are inside the EC2 instance. In order to fetch the Streamlit app, we first have to install git on the instance. Do it by running the following:
sudo yum install git-allAccept the download, it should be a 30-50 mb download.
Clone the repo
The first time we connect to the repo, we have to clone it. After the first time we can use “git pull” instead.
Pro tip: If your Repo is public you can pull it without the PAT.
git clone https://jakobjohannesson:{GITHUB PAT HERE}@github.com/jakobjohannesson/streamlitbase.gitCongratulations, you now have the Streamlit app on the machine.
Run the Streamlit app on the AWS EC2 machine
Check that the folder with the app is there as expected and change directory to it.
ls

cd streamlitbase
Install dependencies (streamlit, matplotlib)
pip3 install streamlit
pip3 install matplotlib
Streamlit run Streamlit.py
streamlit run streamlit.pyYou should see the following.
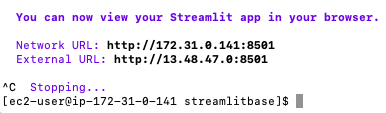
Go to the external URL, in this case: http://13.48.47.0:8501/
Boom there it is!
Maintaining the Streamlit app
One issue is that the app will close if you shut down the terminal. The solution to this is to run TMUX, install it by:
sudo yum install tmux

# Create a new session
tmux new -s StreamSession

# Start the streamlit app again
streamlit run streamlit.py
Boom boom! Great, now we can shut down the terminal and it will run until you shut it down.
If you want to reconnect to the tmux session you can do so by:
tmux attach -t StreamSessionPushing a new version
If you want to push a new version of the app from VS Code, then push it to github. Next, connect to your AWS EC2 machine using ssh again. Change directory to the Streamlit app, then run a git pull:
# Pull the github repo

sudo git pull https://{GITHUB_USERNAME}:{YOUR_GITHUB_PAT}@github.com/{GITHUB_USERNAME}/{STREAMLIT_REPO}.git
Version issues
If your repo for some reason is on different versions, you can reset it.
git reset --hard origin/{STREAMLIT_REPO}Thanks
Thanks for reading my post about how to deploy a Streamlit app. I hope it will deliver value to your data science workflow.
If you enjoyed this guide, please reach out and tell me.
Next step
In the future we will do another blogpost which we dive into a CI/CD workflow to make the process of application development a lot smoother and fun! This will be achieved through implementing Github actions to the repo, allowing you to keep the same version across systems.
This means you do not need to login to your AWS EC2 each time you want to push a new version of the Streamlit app. That is just boring anyway, so we are happy to get rid of the boring parts of development.
Credit to Rahul Agarwalfor his guide
Thanks for the inspiration from this guide. It might give you a different point of view.